Getting started with Planapple
A lot of new people have been visiting Planapple recently, and some have asked about the best way to get started. Here’s a simple guide to get you going and show you how Planapple makes planning a trip easier.
What is Planapple?
At its heart, Planapple is a research and planning tool for the web. It gives you a single place to save your ideas, talk about them with tripmates, and take it all with you on your phone.
Planning a trip on Planapple often looks like this: You…
- Surf the web to find interesting ideas on sites you like
- Save those pages to your trip with the Planapple Save Button
- Talk about stuff with tripmates back on Planapple via comments in the discussion section (like, “What do you think of these 3 hotels?”)
- Organize things into lists, make decisions, and perhaps build an itinerary
- Go on your trip and access the stuff you saved on Planapple from the mobile app
Let’s get started.
First, setup your trip
You’ve probably already created your first trip, but if not, you can do so by clicking the “New Trip” link at the top of the screen. Now’s not a bad time to add some basic information to your trip, such as your travel dates and a destination. (Don’t worry, you can always change these later.)
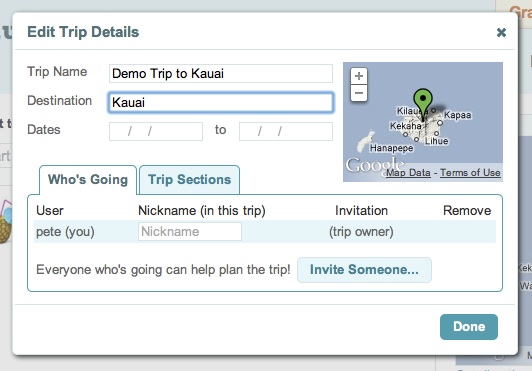
Click on the “EDIT TRIP” link under your trip title to open the “Edit Trip Details” dialog. Here you can rename your trip, set a destination (so you can see it on the map), set your travel dates, and even invite tripmates.
Going on a big trip with multiple destinations? No problem, just click on the “Trip Sections” tab to add a section for each location you plan to visit. Don’t forget to set the destination for each section so you can see them on the map!
Then, save some stuff to your trip
The easiest way to add stuff to Planapple when you’re researching your trip is to use the Planapple Save Button. If you haven’t installed this yet, Get the Save Button will show you how.
Now you need to find some stuff on the web to save to your trip. Already have favorite sites you like use for travel research? Great! Planapple should work well with those sites! But if you’re having trouble getting started, there are lots of suggested searches listed in the “Idea Finder.”
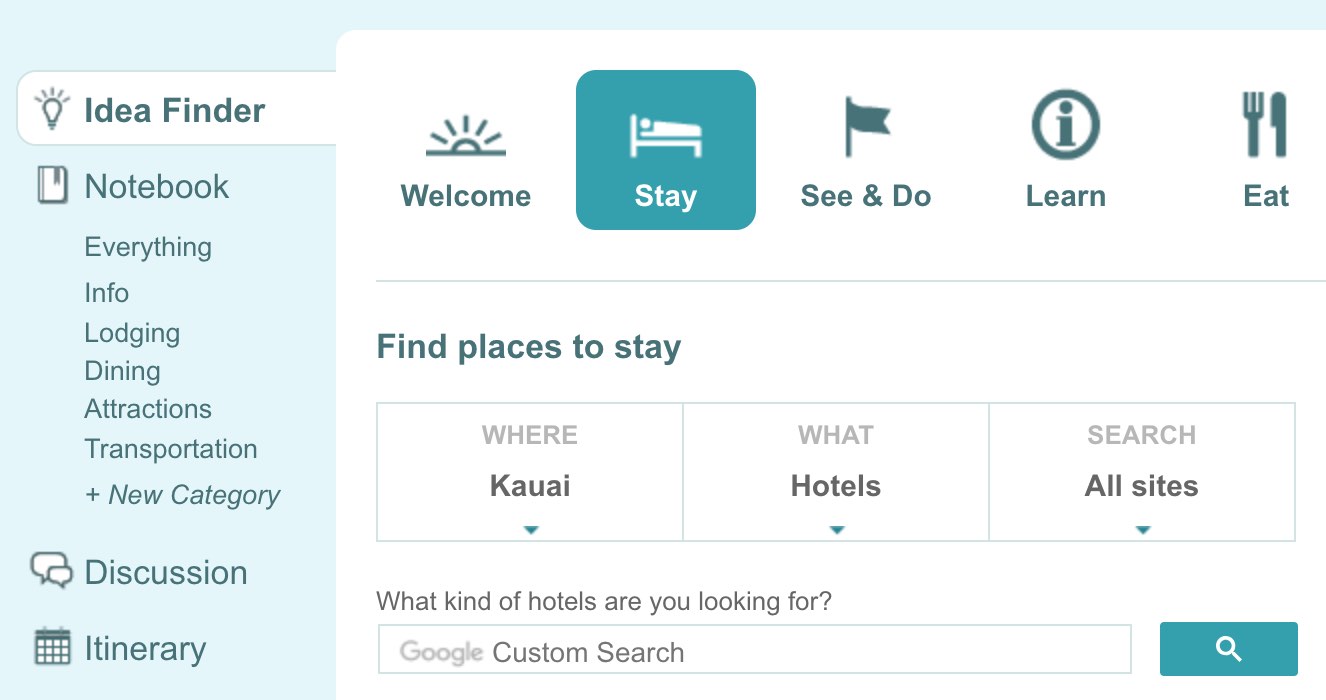
Click on the “Idea Finder” tab on the left, and you'll see several search categories listed as buttons across the top. If you’re looking for hotels, click “Stay” to find places to stay.
The “Stay” panel defaults to search for hotels in several popular travel sites. If that’s not what you want, just change the “Where,” “What” and “Search” options to look in nearby destinations, for other kinds of places to stay (like vacation rentals or hostels), or to search a specific travel site.
Describe the sort of hotel you’re looking for (say, “luxury” or “family”) in the “Search” box, and click the magnifying glass button to search. From the list of matches, click a hotel that looks promising. This will open a new tab in your browser, where you can see what TripAdvisor or another travel site has to say about that hotel.
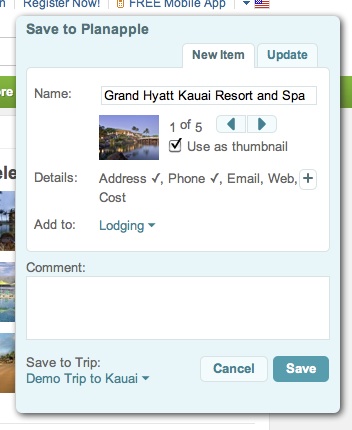
Now save that hotel page to your trip on Planapple by clicking on the “Save to Planapple” button at the top of your browser (you installed it, right?). This should open the Planapple save panel in the upper right of your browser, and show you the information Planapple will save from this page.
You can edit the name of the page you’re saving, toggle through images to use as a thumbnail, select a category (“Lodging”), add a comment, and even change the trip you’re saving to (using the menu in the lower left).
If you click on the “+” button in the “Details” field, you can see if Planapple has gathered any information about this place automatically such as address, phone number, or cost. Click on any of these details fields to edit them yourself.
Finally, click the “Save” button in the lower right to add this page to your trip on Planapple.
How about adding a comment?
Now go back to Planapple in your browser (it should still be open in the previous tab). Click on the “Discussion” tab at the left, and you should see a message that you added a new item to your trip. Click on the item’s title and you should be taken to the item’s “Details” page where you can see more information about the item.
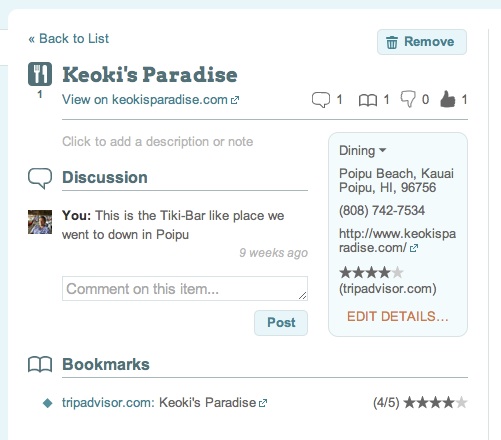
Under the item’s title is a link to open the page you just saved in a new browser tab. In the blue pod on the right, there’s more practical information such as category, address, phone number, and even rating (click “EDIT DETAILS” to change these).
To record your thoughts about this place, click in the comment field under “Discussion” and add a comment. Now click back to the conversation feed for the entire trip by clicking on the “Discussion” tab on the left. Your comment should now show up at the top of the feed.
Other tripmates would most likely see your comment right here at the top of the conversation feed and reply to it there. This is a great way to get people’s opinions about various places to stay and things to do.
Invite a friend
Planapple really comes in handy when you’re traveling with other people. Whether it’s a spouse, significant other, group of friends, or even multiple families, Planapple gives you a single place to pool all of your research, organize it into lists, and discuss it to make decisions. No more huge email threads with buried links and comments!

To invite people to your trip, click on the “INVITE TRIPMATES” link in the upper right to open the “Share” dialog. Enter the emails of the people you’d like to invite and edit the message below to personalize it. Then click the send button at the bottom of the dialog to send the invites.
On the “Discussion” tab you can see a message update that you sent the invites. When your tripmates signup and join the trip, you will also be notified there. (And you can see the status of your invites by clicking “EDIT TRIP” and looking in the “Who’s going” tab of the “Edit Trip Details” dialog.)
Schedule items on the Itinerary
Now let’s say that you and your tripmates have added things to your trip, talked about stuff, and made some decisions. You’d like schedule items on the itinerary, so you can keep track what you’d like to do on different days for your trip. (Yes, some people like to schedule stuff when they travel—if this is news to you, and you’re not one of those people, you can skip to the next section).
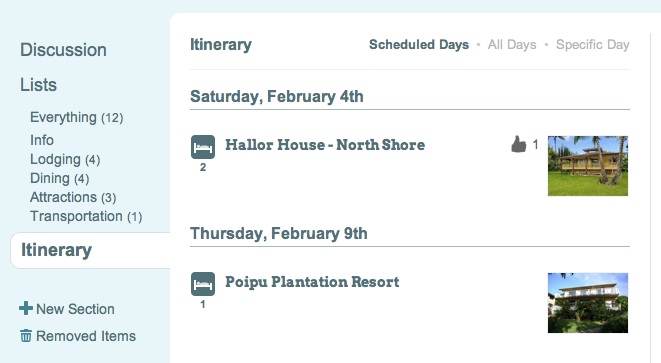
Adding items to the itinerary is easy. Simply drag an item out of the list in the middle column to the calendar on the right (drop it on the day you want). Now click on the “Itinerary” tab on the left. You should see a short list of scheduled items grouped by day (maybe only one item because that’s all you’ve scheduled so far).
If you click on “All Days” at the top right of the list, you can change the view to show all the days in your trip, even the empty ones. Here you can drag an item to a new day to change when it’s scheduled. For even more detailed scheduling open the “Add Item to Itinerary” dialog by clicking into an item’s details screen, clicking “EDIT DETAILS” in its details pod on the right, and then clicking “EDIT” next to its date.
Bonus! Forward emails to your trip
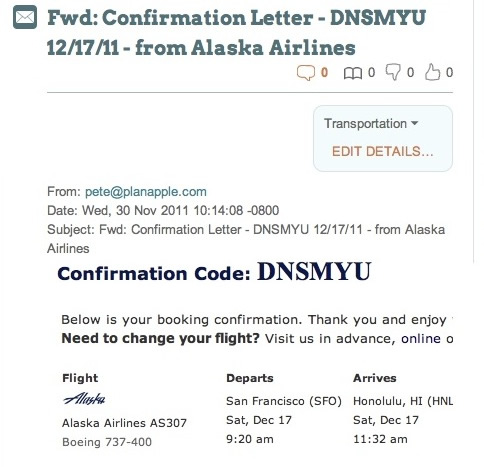
Here’s a quick bonus feature that might come in handy. When you book your flight or accommodations, you often get confirmations via email. Those emails usually have important information like dates, times, and confirmation numbers. And inevitably those emails are hard to keep track of among all the other emails you have in your email account.
Planapple lets you forward those emails to your trip so you can view their contents right next to all the web research you’ve collected. Just forward your confirmation emails to save@planapple.com from the email address you used to signup with Planapple. (Make sure that you “verified” your email address after you signed up—go to your Email Address Settings to resend a confirmation if you didn’t.)
That’s it, good luck!
I hope this guide has given you a good overview to get you started planning a trip with Planapple. There are many more features available to make your planning process easier—too many to cover all of them here. Check out the Planapple knowledge base for more tips and tricks. Or hit us up with any questions—just click the orange help balloon at the bottom right.
Thanks again and good luck with your travels!